Prep School: Why You Need To Dry Brine Your Turkey And Chicken
If you've ever sought out how to cook a Thanksgiving turkey or weeknight roast chicken, odds are you've heard the phrase brining. Brining, for you visitors to our fair planet, is the process of applying salt to meat, poultry or fish—in advance of cooking—for the purpose of improving its flavor, texture and juiciness. Today, because Thanksgiving is rearing its lovely head, we'll limit our discussion of the topic to turkey and its fellow winged beast, chicken.
How to Thaw a Frozen Turkey? And Other Thanksgiving Questions, Answered
When brining, salt generally is applied in one of two ways: It can be sprinkled directly over the surface of the item in what's called a dry brine, or it can be dissolved in water to create a wet brine.
Before you dive into brining, there is one thing to note. Some brands, like Butterball turkeys and kosher poultry, come already treated with a salt solution. Therefore, there's no need to brine at home—you'll just end up with an overseasoned bird. Check the packaging before you buy and brine.
What is a wet brine?
First, let's talk about that wet brine. A rule of thumb is to add about 1/4 cup Kosher salt per quart of water. Brining can take anywhere from an hour to a whole day, depending on the size of the item we're cooking. The salt in the brine acts on the proteins in the meat in such a way that the meat becomes more tender. Moreover, as you would expect, soaking something in salt water is going to make it wetter and saltier. That means that, along with that increased tenderness, brined items come out juicy and nicely seasoned. Who can argue with that?
The problem with wet brining
Believe it or not, there are some issues with a wet brine.
First off, adding water to the meat can dilute its flavor—not much, mind you, but it's a result you might not appreciate with your already mildly-flavored turkey.
For me, though, the real problem is that container of brine. It's not a big deal if you're just doing a couple pork chops or chicken breasts. However, once you start brining something as large as a turkey, it becomes problematic. Consider the size and shape of the vessel needed to brine a whole turkey and ask yourself how you're going to keep it cold overnight.
On top of that, remember you're soaking raw poultry, and when you dump that brine down the drain, that icky poultry water is going to slosh all over your kitchen, contaminating it in the process. (As an aside, that's why you should never rinse your poultry in the sink—all the splashing flings those salmonella-laden droplets around the kitchen.)
Between the watered down flavor, the struggles of finding a vessel and place to store a big bird as it soaks and the danger of bacteria showers, you should consider a dry brine.
What is a dry brine
Dry brines work the same way as wet brines, only without the added water. Here's all you do: Sprinkle the surface of the meat with Kosher salt and let it sit in the fridge for several hours or overnight. The ratio is generally about 1/2 teaspoon of kosher salt per pound of meat.
The salt draws water from the meat. That water dissolves the salt, creating a brine. That brine then gets reabsorbed into the meat, just like a wet brine. Finally, the salt tenderizes and seasons the meat. While studies have shown that dry brined meats aren't quite as juicy as wet brined, any brining makes meat juicier than no brining at all.
Now, remember, the idea is never to expect perfection on your first try, or even your first few tries. If you're planning on brining your Thanksgiving turkey, go with a dry brine for the reasons listed above. But first, practice your dry brine technique with roast chicken for weeknight dinners. That way, when Thanksgiving comes, you'll already be a couple steps ahead.
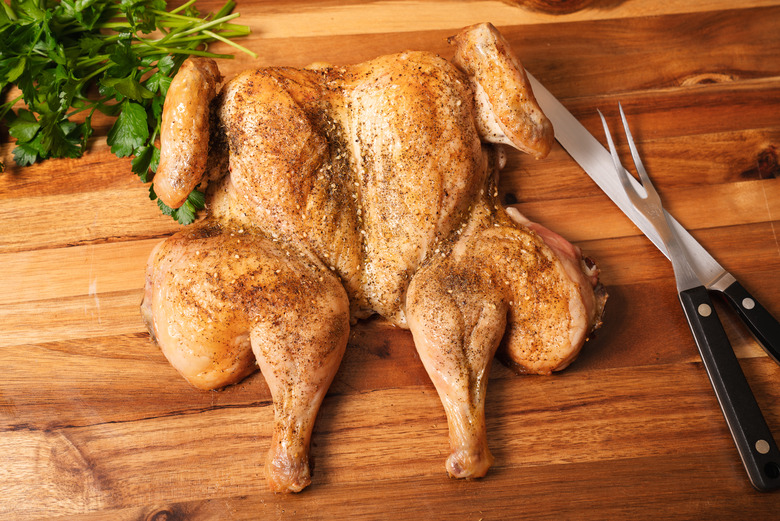
Dry Brined, Roasted, Spatchcocked Chicken With Herbed Pan Sauce
Prep time: 15 minutes
Brining time: Up to 24 hours
Cooking time: 40 minutes
Makes 4 to 8 servings
-
1 3- to 4-pound roasting chicken
-
2 teaspoons kosher salt plus more as needed
-
Unsalted herb mix, such as za'tar or lemon pepper as needed (optional)
-
Pan spray as needed
-
Herbed Pan Sauce, as needed (see accompanying recipe)
Step 1: To spatchcock chicken: Using kitchen shears or chef knife, remove backbone and reserve. Flip chicken onto breast side and spread two sides to expose breast bone. With a chef knife, make a small slit at the top of the breast bone to free from its membrane. Use fingers to pull bone free. Reserve bone.
Step 2: Sprinkle chicken evenly with 1 teaspoon salt. Flip chicken onto sheet pan or large platter and sprinkle evenly with 1 more teaspoon salt. Refrigerate chicken, uncovered, overnight, up to 24 hours.
Step 3: To roast, remove chicken from refrigerator and place on a foil-covered sheet pan, skin-side up. Do not rinse. Tuck wing tips back under chicken breasts to secure. Sprinkle with optional herb mix and spray lightly with pan spray. Roast in a preheated 425 F oven to an internal temperature of 165F, about 35-45 minutes.
Step 4: Remove chicken to a cutting board. Pour liquid fat off the roasting pan and discard. Using a rubber spatula, scrape up coagulated juices, taste for saltiness, and reserve for pan sauce (see accompanying recipe).
Step 5: Carve chicken into serving pieces and serve immediately with sauce.
For the Herbed Pan Sauce:
Prep time: 10 minutes
Cooking time: 30 minutes
Makes about 2 cups
-
2 tablespoons oil
-
1 chicken backbone, cut into 1-inch pieces
-
1 chicken keel bone, cut into 2 or 3 pieces
-
2 tablespoons small diced onion
-
1 tablespoon small diced carrot
-
1 tablespoon small diced celery
-
2 1/2 tablespoons flour
-
2 cups canned chicken broth or homemade stock
-
1 bay leaf
-
1 tablespoon minced fresh herbs or 1 teaspoon dried thyme, herbs du Provence, za'tar or herbs of your choice
-
Scraped, coagulated juices from roast chicken (optional)
-
1-2 tablespoons whole butter
Note: Begin the sauce when the chicken goes in the oven. Coagulated juices from the pan add flavor and richness to sauce. Just taste before adding to determine saltiness.
Step 1: Heat 2 tablespoons of oil to nearly smoking in a small, heavy bottomed saucepan over medium-high heat. Add reserved backbone and keel bone pieces. Sear, stirring occasionally, until brown, about 1-2 minutes.
Step 2: Add 2 tablespoons diced onion, 1 tablespoon diced carrot and 1 tablespoon diced celery and sauté until lightly browned, about 5 minutes.
Step 3: Sprinkle 2 1/2 tablespoons flour over bones and vegetables and stir to combine. Cook until mixture starts to darken, about 3-5 minutes.
Step 4: Whisk in 2 cups chicken broth, add 1 bay leaf and 1 tablespoon herbs, bring to a boil, then reduce heat and simmer slowly until starchy taste disappears, about 20 minutes.
Step 5: Taste chicken pan juices for saltiness. (The juices may be fairly salty because of the brine.) Depending on the saltiness of juices, stir all or part into simmering sauce and simmer to combine flavors, about 3-5 minutes.
Step 6: Pass sauce through a fine mesh strainer into a clean pan and discard solids. Return to heat just long enough to return to a simmer, then remove from heat and whisk in whole butter. Taste again for seasoning and add salt as needed. Serve immediately with roast chicken.