12 Mistakes You're Probably Making When Cooking With Cheese
Who doesn't love ooey and gooey cheese added into a casserole, pasta sauce, or just about any other recipe? Cheese enhances the texture, flavor, and aroma of a dish, making it all the more delicious and enjoyable. However, while adding cheese has the potential to really transform a recipe for the better, that is not always the case.
If you make one (or more) of the most common mistakes when cooking with cheese, the recipe you're preparing could turn out too liquidy or taste off. Did you know that the type of cheese you use to make a pizza matters? Or that you've been making some sacrifices by purchasing a pack of pre-shredded cheese at the store instead of grating your own? These are just a few of the many mistakes you might have been making. If you want to make sure that each recipe you prepare turns out perfectly, read on to learn how to avoid several of the errors people make when cooking with cheese.
1. Not grating or shredding your own cheese

Sure, picking up a bag of shredded cheese at the grocery store is convenient. You don't have to dig out your cheese grater or take any extra time before adding the cheese to a recipe. However, despite how convenient it may seem, buying pre-shredded cheese is often a mistake. First, to keep the pieces of cheese from sticking together, manufacturers use preservatives. These preservatives, which may be something like potato starch, can prevent the cheese from melting as nicely when it is added to a recipe. When you use freshly-grated cheese, your dish should turn out much smoother.
Pre-shredded cheese may also include other additives and chemicals, meaning you're eating more than just cheese every time you use it. When you grate your own cheese, you can know exactly what you're adding to each recipe. Another benefit of shredding or grating your own cheese is that it will make it easier to experiment with different types of cheese. There are only so many pre-shredded options available at the grocery store compared to the number of blocks of cheese you're likely to find.
2. Not knowing how to properly grate or slice cheese

When cooking or serving cheese, it is important to know how to grate or slice it properly. Let's start with grating or shredding cheese first. The best way to shred cheese is to use a grater. Both handheld or box graters can work, but each offers pros and cons. Box cheese graters often allow for more customization of the size of the cheese, but it can take longer to shred a block of cheese using one.
A handheld model can work a bit more quickly. However, if you're shredding a large quantity of cheese, your hand can get tired or even cramp up. If you don't have a cheese grater, you can also use a food processor with a grating plate. Regardless of the shredding method, make sure that your cheese is nice and cold before you start. If it is too soft, it will get smooshed as you try to grate it. Put mozzarella and other softer cheese in the freezer for about 15 minutes before you try to grate them.
The right way to slice cheese will depend on the type you're cutting and its shape. Soft log cheeses can be sliced into even sections or left unsliced to be spread over crackers or bread. Hard wheel-shaped cheeses can be cut into triangle-shaped wedges for serving. Soft wheel-shaped cheeses that aren't too gooey can also be cut into slices. However, gooier wheel cheeses should be left whole and dipped into using a spreader. Score the top layer and peel it back to reveal the soft center.
3. Not melting it properly

If you're going to cook with cheese, then it is essential to know how to properly melt it. First, it is nearly always better to choose the stovetop over the microwave when melting cheese. If you try to melt cheese in the microwave, it is more likely that it will get burnt or overheated. When you melt cheese over a burner, you can monitor its progress more closely and avoid ruining your recipe. You want to set the burner to the lowest setting possible when melting cheese. If there is too much heat, some of the fat and moisture will be lost, having a negative impact on the final taste and texture of your meal. Before starting to melt your cheese, give it a few minutes to come to room temperature. This will help it to melt more evenly.
As you're melting cheese in your saucepan, you will need to stay nearby to monitor its progress. Leaving the cheese on the hot burner without monitoring it is asking for it to burn and ruin your recipe. As the cheese melts, stir it around the pot to make sure it doesn't burn or stick to the side. Stirring also helps to ensure that the cheese melts evenly. As soon as the cheese is melted, take the pan off of the heat to avoid overheating it. Leaving the cheese over the heat for too long could make it turn rubbery.
4. Throwing out the rind

When you buy a block of Parmesan, Camembert, or Brie cheese, what do you do with the rind? Most cheese rinds are edible – and even if you don't like the way they taste on their own, they can be added to different recipes to avoid wasting them.
There are three main types of rinds you'll find on cheese. The first is a washed rind, found on ColoRogue or Red Hawk cheese. The rind for these cheeses is made by washing them with a brine or alcohol so that edible mold can grow. The rind will have an orangish or reddish color to it. You'll find washed rinds on more aromatic cheeses. The rind is completely edible. However, if it tastes too salty, save it for one of the ideas described below.
Bloomy rinds, found on cheeses like Brie and Camembert, are also completely edible. This type of rind forms after edible mold spores are sprayed on the cheese and ripen and bloom over time. The third type of rind you might see is a natural rind. During the production process of cheeses such as Parmigiano-Reggiano or Montgomery cheddar, the air in the room will cause the outer layer to dry and harden. As the rind hardens, it's rubbed with salt or a brine-soaked cloth.
Instead of throwing out a cheese rind that you don't want to eat, clean them and scrape off the engraving on a natural rind. After this, you can add them to soups and pasta dishes, fry them, use them to make grilled cheese, and more.
5. Adding cheese to a recipe too early

Adding cheese to a recipe too early is a mistake you'll want to avoid. If the cheese is added too soon, it can have a negative impact on the overall texture of the finished recipe or even its taste. If you want to melt some cheese over a bowl of warm vegetables or a pot of spaghetti or another pasta, wait until you're almost ready to serve the food to add the cheese. It shouldn't take long to melt — provided you've grated or shredded it first — and then will be ready to serve immediately. If you add it to the pot or bowl too far ahead, after it melts, it will drip down to the bottom, where it will harden.
Cheese is often used to top baked casseroles. Here again is another example of when you should avoid adding the cheese topping too early. Wait until the casserole has almost finished baking. Then, add the cheese and let the dish finish baking for about 15 more minutes before serving. This way, the cheese won't end up browning too much or getting burnt.
6. Choosing a non-melting cheese to top your burgers and hot sandwiches

The next time you're craving homemade cheeseburgers, don't make the mistake of choosing the wrong type of cheese to top them. While there is no single best cheese for burgers, there are some that you'll want to avoid using. Some cheeses don't melt well, which is going to leave you with burgers with rigid slices of unmelted cheese on top of the meat.
There are several factors that can impact how well a cheese will melt — or if it will even melt at all. For example, high-fat cheeses melt much better than their lower-fat counterparts. Cheeses with a higher moisture content will melt much better than drier cheeses. This is because when there is more moisture in a cheese, it means that the milk proteins will not be packed as tightly, allowing them to separate — or melt — more easily. Think about the difference between trying to melt American versus Parmesan cheese. Another factor that can come into play is the age of the cheese. Aged cheeses typically do not melt well. They're more likely to turn oily or grainy if you try to melt them.
So, what are some of the best cheeses for melting to use for burgers and hot sandwiches? Try mozzarella, American, cheddar, provolone, or gruyere.
7. Using the wrong type of cheese when making pizza

Mozzarella is often the cheese of choice when making pizza. It melts beautifully, offers a nice flavor complement to the crust and sauce, and doesn't burn or brown more quickly than the crust is able to bake. But did you know there can be a right and a wrong type of mozzarella to use when making pizza? You'll want to choose a low-moisture mozzarella to avoid introducing too much liquid into the equation and ending up with a soggy crust or melting cheese sliding off the pizza. It is also best to grate a block of mozzarella cheese yourself instead of buying a bag at the store. The starches added to the pre-shredded mozzarella can negatively impact the cheese's ability to melt smoothly and evenly over the top of the pizza.
If you like the way fresh mozzarella tastes, you may be wondering whether you can use it when making a pizza at home. While the answer isn't no, you can't simply take it out of the package and throw it on the pizza. If you've ever had fresh mozzarella before, you know that it has a lot more moisture than standard mozzarella cheese. So, if you simply toss it on top of the pizza, it isn't going to turn out well. Instead, take some extra time to drain off the excess liquid from each slice. Then, lay the slices out for about 20 minutes over a paper towel or dish rag. This will help absorb more of the moisture before the cheese is added to your pizza.
8. Not taking a few extra precautions when air frying cheese

An air fryer can be a real asset in the kitchen. You can use it to cook many delicious recipes with cheese, including pizza, cheeseburgers, and cheese fries. However, there are a few things you'll want to keep in mind before putting cheese in your air fryer. First, avoid placing cheese in the air fryer by itself or directly over your basket or tray. It will get stuck on the rack, leaving you with a huge mess to clean up.
The best recipes with cheese to make in an air fryer are ones where the cheese is contained in something else — such as mozzarella sticks or between two slices of bread — so it won't be touching the rack and melting all over it. If you do want to make something like cheeseburgers or an open-face sandwich with cheese, be careful. The air circulating in the air fryer may blow the cheese right off of your burger and onto the rack, where it will end up melting and burning. A genius air fryer hack to avoid this problem is to use a toothpick to keep the cheese in place as it melts over your sandwich. Lining the tray or basket with parchment paper when air frying cheese can also help minimize stuck-on messes.
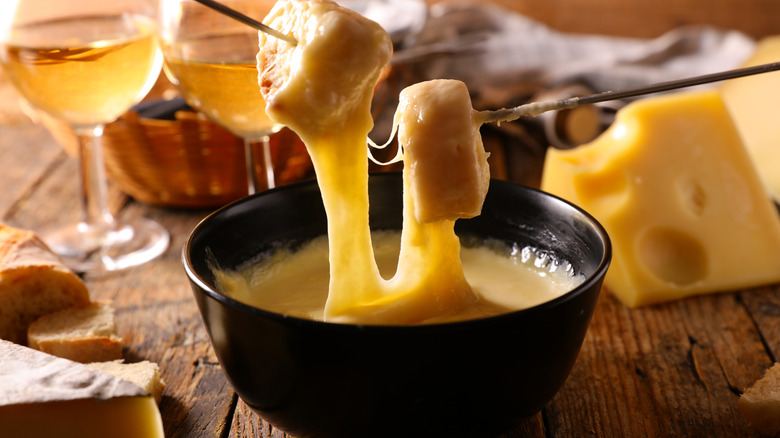
9. Not adding sodium citrate when making cheese sauces

Cheese sauces of all varieties can be scrumptious. Whether you're making queso dip for chips, melting cheese for a fondue, or making a cheesy sauce for pasta, there's a trick that can help it turn out even better. Try adding sodium citrate to the cheese and other ingredients in the recipe.
Sodium citrate makes cheese less acidic. It also increases the solubility of the proteins, which helps ensure that they don't separate as the cheese melts. So, when you add it to a cheese sauce, the cheese will melt much more evenly and turn out creamy and smooth. It doesn't take much sodium citrate to provide these optimal results. All you'll need is about 2% of the total weight of the cheese and other ingredients in your sauce. Be careful not to overdo it when adding sodium citrate, though. While it is quite effective at helping the cheese melt, too much of it may make your recipe taste too sour or salty.
10. Forgetting you can also use cheese to make desserts

When you think about cooking with cheese, your mind likely focuses on more savory recipes, such as lasagna, fondue, or risotto. While these recipes certainly represent great ways to cook with cheese, don't forget that this dairy product can also be used to make incredible desserts.
Ricotta cheese and cream cheese are two types of cheese that you'll often find features in dessert recipes. They can help you make cheesecake, loaf cake, parfaits, dessert grilled cheese, and frosting. Other cheeses that you might find in some dessert recipes include mascarpone, goat cheese, Brie, and burrata.
You can also pair many types of cheese — such as aged gouda, mild blue cheese, brie, Camembert, or pecorino — with some jam, jelly, or marmalade on a cracker or piece of bread to satisfy a sweet tooth. The next time you have a party, try making a dessert charcuterie board with thumbprint cookies, chocolate-covered strawberries, raspberries, buttery crackers, jam, nuts, and various types of cream or rich cheese, such as those shared above.
11. Not knowing how to soften cream cheese for recipes

Whether you're making a no-bake cheesecake, frosting, or a savory dip using cream cheese, you'll need to soften the cream cheese before you can mix it with the other ingredients. Knowing how to properly soften the cream cheese is important. You want it to have the right texture; otherwise, it may be too hard and cold to mix with the other ingredients. If you end up melting it instead of softening it, the cream cheese will be too runny, and the texture of the finished product will be off.
The best way to soften cream cheese is to leave it out on the counter for about 30 to 45 minutes. As the cheese comes to room temperature, it will soften nicely, making it much more workable for mixing with the other ingredients. If you are in a rush or forgot to take the block of cream cheese out in advance, you can try using the microwave, but you'll want to be very careful to avoid melting or cooking the cheese. It will only take a few seconds to soften the cheese, so set the microwave for about 10 seconds at a time at lower power (about 50%). Check on its progress after each 10-second interval, and add more time if needed. Another option is to give your hands a little workout and squeeze the package of cream cheese between them. Knead it through the wrapper until it moves much more freely.
12. Not realizing that vegan cheese will require different cooking techniques than its dairy counterpart

Today, it is very easy to find vegan substitutes for cheese. Many of the products out there taste very similar to the real thing. However, it is important to remember that they are not actually dairy products and will not cook identically to the cheeses they are designed to replace. One of the biggest differences between plant-based cheese and dairy cheese is that they don't melt in the same way. Some plant-based cheeses, particularly those that are made from nuts, won't get as creamy as dairy cheeses — and melting them can be more difficult. When making something like grilled cheese with some vegan substitutes, you might find that it will turn out better if you pre-melt the cheese for a few seconds in the microwave before putting it in the pan. Also, keep in mind that some vegan cheeses won't look that different, even when they're melted. Some tend to keep their form better than real cheese, meaning that looks may sometimes be deceiving.
Because vegan cheeses don't always melt as quickly, you'll also need to be more purposeful when adding them to your recipes. Shredded cheese, as opposed to slices, will work better for sauces or casseroles. The smaller shreds will melt more quickly and evenly than a larger slice or chunk of "cheese."