Black Forest Icebox Cake
Black Forest Icebox Cake
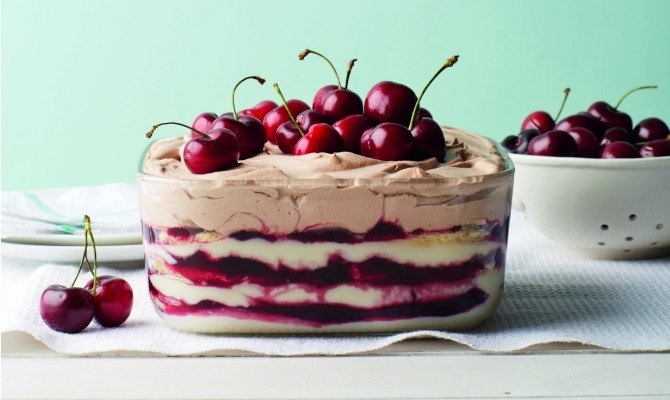
Traditionally, a black forest cake is a chocolate cake layered with whipped cream and cherries. Our version keeps the cherries, puts the chocolate in the cream, and substitutes ladyfingers for the cake itself. The kirsch pudding, made with the cherry liqueur that is mandatory in the original German recipe, tames the sweetness of the cherry preserves, making this the ideal treat to pair with wine. (You’ll have extra ladyfingers left over after assembling your cake — lucky you! Store them in a resealable plastic bag in the freezer and enjoy them for up to one month.) — Jean Sagendorph and Jessie Sheehan, authors of Icebox Cakes: Recipes for the Coolest Cakes in Town.
servings
12
Ingredients
- 6 eggs, separated
- ½ cup granulated sugar, plus 3 tablespoons
- 1 ½ teaspoon pure vanilla extract
- 1 cup all-purpose flour
- ½ teaspoon salt
- confectioners sugar for dusting
- 1 cup granulated sugar
- ¼ cup cornstarch
- ¾ teaspoon salt
- 2 ½ cup whole milk
- ¾ cup heavy cream
- 1 egg, lightly beaten
- ¼ cup kirsch, or to taste
- 1 tablespoon unsalted butter, at room temperature
- 2 teaspoon pure vanilla extract
- 1 ½ cup heavy cream
- ¼ cup confectioners sugar
- ¼ cup kirsch, or to taste
- ½ teaspoon pure vanilla extract
- 3 tablespoon dutch-process cocoa powder, sifted
- a generous 2 cups cherry preserves, whisked vigorously to ease spreadability, if necessary
- cocoa powder (optional) and fresh cherries for decorating
Directions
- Position a rack in the center of the oven and preheat to 350 degrees F. Line 2 baking sheets with parchment paper.
- In the bowl of a stand mixer fitted with the whisk attachment, beat the egg yolks, ½ cup granulated sugar, and vanilla on medium-high speed until the mixture doubles in volume, is very yellow, and falls in a ribbon when the whisk is lifted out of the bowl, about 5 minutes (7 to 9 minutes if using a hand mixer).
- Sift the flour over the mixer bowl and very gently fold it into the yolk mixture with a rubber spatula. The batter will be very thick. Transfer the batter to a large bowl and clean the mixer bowl and whisk attachment.
- In the clean mixer bowl, fitted again with the whisk attachment, whisk the egg whites and salt on medium speed until soft peaks form (the peaks should flop over when the whisk is lifted from the bowl). Add the remaining 3 tablespoons granulated sugar, 1 tablespoon at a time, whisking to incorporate after each addition, and then whisk for 5 minutes, until stiff peaks form (the peaks should stand upright when the whisk is lifted from the bowl).
- In 3 batches, gently fold the beaten whites into the yolk mixture until just incorporated, being very careful not to decrease the volume you’ve just created. Your batter might look a bit curdled; that’s okay.
- Fit a large pastry bag with a ½-inch #806 Ateco round tip, or use a large, heavy-duty resealable plastic bag and snip off a small to medium hole from the corner. Fill the bag with batter and pipe 3-by-1-inch fingers onto each of the prepared baking sheets, five to seven ladyfingers per row, and up to twenty-five ladyfingers per sheet (they don’t spread very much). Unless you have several baking sheets, you will need to reuse your sheets to finish piping the batter.
- Just before baking each sheet, generously dust confectioners sugar over the ladyfingers, leaving a thick coat of sugar, which will create a nice, crunchy crust when baked.
- Place one baking sheet of ladyfingers in the oven and bake until they are puffy, dry to the touch, and just very slightly browned, 10 to 12 minutes, rotating the sheet halfway through the baking time. Let the ladyfingers cool on the baking sheet for 1 to 2 minutes. When they are still warm, use a small offset or other thin spatula to transfer them to a wire rack to cool completely. Repeat with any leftover batter on cooled baking sheets.
- Store the ladyfingers tightly covered at room temperature for up to 3 days. Freezing the ladyfingers in a resealable plastic bag for up to 1 month also works well. There is no need to defrost the ladyfingers before assembling your cake.
- In a medium saucepan, combine the granulated sugar, cornstarch, and salt. Add the milk and cream and whisk to combine. Add the egg, whisk again, and place the saucepan over medium-high heat, whisking constantly.
- Once the mixture begins to thicken and bubbles begin popping on the surface, turn the heat to medium and whisk vigorously for 45 seconds. Remove the pan from the heat.
- If the pudding has any lumps, strain it through a medium-mesh wire sieve into a heatproof bowl. Add the kirsch, butter, and vanilla and whisk until they are incorporated.
- The pudding should be used almost immediately; it should still be warm and relatively pourable when you layer it with the ladyfingers.
- Refrigerate the bowl of a stand mixer and the whisk attachment (or a medium metal bowl and beaters from a hand mixer) until quite cold, about 15 minutes.
- Once chilled, remove the bowl and whisk from the refrigerator, add the cream, and whip it on medium speed until just thickened.
- Add the confectioners sugar, kirsch, vanilla, and cocoa powder and, on medium-high speed, whip the cream until it holds stiff peaks that stand upright when the whisk is raised. Use it immediately.
- Using a small offset spatula or the back of a spoon, spread a generous layer of the pudding on the bottom of the baking pan.
- Cover as much of the pudding as possible with a layer of the ladyfingers, filling any gaps with broken ladyfingers. The pieces should touch. The goal is a solid layer of ladyfingers.
- Generously spread a layer of the preserves over the ladyfingers.
- Continue layering in this order (pudding, ladyfingers, preserves) until you run out or reach the top of the pan. Spread the top of the cake with the whipped cream and gently cover it with plastic wrap. Refrigerate for 24 hours.
- Peel the plastic wrap from the cake and lightly dust the cake with cocoa powder, if desired, and top with the fresh cherries. Serve portions directly from the pan.