Ciabatta
Ciabatta
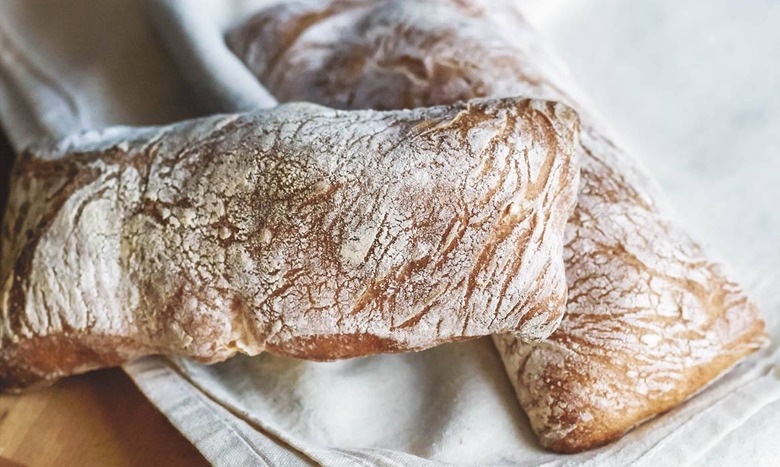
Ciabatta is known for its high proportion of water to flour, and the amount of water gives the bread its rough, slack shape (ciabatta means “slipper” in Italian). Here is where the additional ounce or two of water is going to make a drastic difference in the way you manipulate the dough, and in the bread’s final appearance: The interior structure will be a lovely network of large holes surrounded by lacy strands of bread. I am known for my big, domed ciabatta, which I introduced to the New York City marketplace way back in the 1990s as a cornerstone of my bread-making business—but the easiest ciabatta shape to manage is the familiar long, flat rectangle, which can serve for making all kinds of sandwiches or for dipping into hearty soups and stews. The dough itself can also be the basis for pizza dough and even crackers. Making ciabatta for the first time may feel like an impossibly sticky and messy process, but have faith and don’t be scared—the work is worth the results, as ciabatta is a true plea-sure to behold and an even greater pleasure to eat.Excerpted from One Dough, Ten Breads, © 2016 by Sarah Black. Reproduced by permission of Houghton Mifflin Harcourt. All rights reserved.
Ingredients
- 1 1/2 teaspoon active dry yeast
- 2 teaspoon salt
- 1 3/4 ounce warm water
- 16 ounce unbleached bread flour
- 13 ounce cool water
- vegetable oil
Directions
- Measure the yeast and the salt separately and set them aside.
- Weigh the warm water into a small bowl. The warm water should feel hot to the touch, between 105° and 115 degrees F. Sprinkle the yeast on top of the water, stir to dissolve, and set aside.
- Weigh the flour into a large mixing bowl. Sprinkle the salt on top of the flour, stir to incorporate, and then make a well in the center.
- Weigh the cool water into a small bowl. The cool water temperature should be between 70 degrees and 75 degrees F.
- Add the yeast mixture to the flour, stir 3 or 4 turns, then, little by little, add the cool water. Mix with your hands for 2 to 3 minutes, until all of the ingredients are incorporated, the grit of the salt is dissolved, and the dough forms a rough and shaggy mass, and then stop.
- Cover the bowl with a kitchen towel or plastic wrap and let the dough stand still for about 30 minutes.
- Sprinkle your work surface with flour and then use a plastic bowl scraper to scrape the dough out onto it. Tap your hands in a little flour, then gently flatten the dough into a rectangle, with the short side facing you.
- Use your fingers or the plastic scraper to flip the top edge of the dough down to just below the center, then flip the bottom edge up to just above the center. Repeat this process for the right and left sides, then turn the dough over and dust off the flour.
- This wet dough will benefit from a second fold; let the dough relax for 1 to 2 minutes after the first fold, then sprinkle a little more flour on your work surface and fold a second time.
- Oil a second large bowl, then place the dough in it, seam side up, to oil the top. Then turn it seam side down, and cover the bowl with oiled plastic wrap. Mark the time with a felt-tipped pen on the plastic wrap and allow the dough to rest and rise in a moderately cool place until the dough has doubled in volume, 1 to 2 hours, depending on the heat of your environment.
- After the first 30 minutes of fermentation, turn the dough out of the bowl onto your work surface, and fold again as described above. Return the dough to the bowl, cover, and complete the fermentation.
- NOTE: The dough is folded again to build strength, which is necessary because this is a highly hydrated dough.
- Once the dough has doubled in volume, sprinkle a lot of flour onto your work surface, and prepare a proofing place for the ciabatta by sprinkling the same amount of flour onto the back of an inverted baking sheet.
- Use the plastic scraper to scrape the dough out onto the work surface, letting it assume its natural shape. Tap your hands in flour, and gently flatten the dough into a large, even rectangle measuring approximately 12 by 8 inches and 1 inch thick.
- Use a metal bench scraper or knife to cut the dough into 4 equal pieces, approximately 4 by 6 inches. Gently place them on the floured back of the baking sheet.
- Cover the ciabatta with oiled plastic wrap and let proof until the dough has doubled in volume, 30 to 45 minutes.
- Sarah’s Note: As the pieces of ciabatta proof on the floured surface, they pick up a pattern of flour that will show with beautiful striations once the loaves are turned over to bake.
- While the shaped dough is proofing, preheat the oven to 480°F, with an empty pan for creating steam on the bottom of the oven. Have ready a spritzer filled with water near the oven and approximately 8 ounces of hot water to pour into the empty pan.
- Once the dough has approximately doubled in volume, sprinkle more flour on the work surface. Take 1 dough piece at a time and stretch it very gently to lengthen it by 2 to 3 inches, then place it on the floured area of your counter. Dust off your baking sheet, turn it right side up and oil it, and place each piece upside down on the baking sheet.
- Sarah’s Note: Both stretching the ciabatta and turning the dough upside down elongate and open up air pockets in the dough.
- Open the oven door, and, working quickly, slide the baking sheet with the ciabatta onto the middle rack, then pour the hot water into the empty pan below to create steam before quickly closing the oven door. After 1 minute, open the oven door and spritz around the dough with water, then close the door again.
- The ciabatta should bake to a very dark brown in 45 to 55 minutes.
- Let the ciabatta cool completely on a wire rack. After the bread has cooled, use a serrated knife to cut it horizontally through the center, and take a look at the interior.
- Ideally you will have baked the ciabatta to a very dark brown so that the caramelization of the crust permeates the entire flavor of the bread, and the crust is eggshell thin, perfect for a sandwich. The holes in the crumb will be large, embedded in the cobweb strands of glistening dough; notice how much lighter the ciabatta is than the focaccia, and how much larger the holes of the crumb are.