How To Decorate Cookies Like A Professional
During the holidays, Jay Muse's team at Lulu Cake Boutique creates eye-catching cookies that almost look too nice to eat. We asked Jay to walk us through the steps of creating professional-looking sugar cookies.
While these beautifully decorated cookies aren't difficult to make, perfecting the techniques may take practice. Be inspired when decorating, and remember to have fun. Even if you're cookies don't turn out the way you wanted, they are sure to be delicious.
1. Bake your cookies.
2. Let the cookies cool.
3. Prep your pastry bags with royal icing (this stuff dries fast in the dry winter air, so don't overstuff the bag. You can always refill it).
4. Make a variety of colored icings for spreading, thinning out the royal icing with water and adding a drop or two of food coloring, until you've created the desired color.
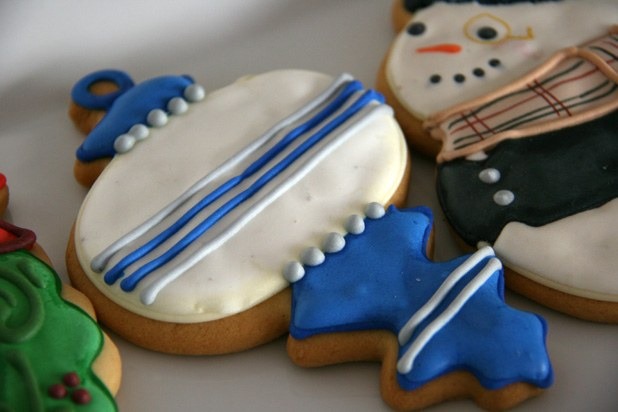
5. Decide how you will decorate your cookie. You will need to pipe an outline of the borders of different colors, similar to the black lines in coloring books, delineating where one color stops and another starts.
6. Pipe the icing onto the cookie.
7. Spread the colored icing. You can use a spoon to drop a bit of icing on the area you're working on, and then use a knife to spread it around. The beauty of thinning out the icing is that any bumps will slowly flatten, leaving the surface relatively smooth.
8. If you're piping decorations on top of the iced surface, be sure to let the icing dry enough so that you don't mess it up. Colored icings for piping can be made by just adding food coloring to a bit of plain royal icing without adding any water to thin it out.
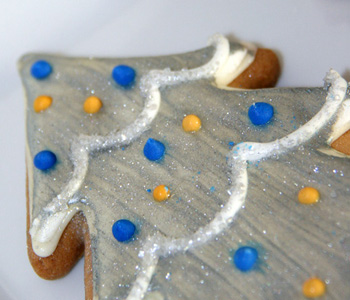
9. Add any disco glitter or sanding sugar to the cookies while the icing is still wet, so that it sticks. If you want to "paint" edible glitter on the cookie, like in Lulu's tree cookie, you will want to do that after the icing you will be painting on is completely dry.
10. Let the cookies dry completely before stacking them – or devouring.
Click here to see Tips for Hosting a Cookie Decorating Party.
This post was originally published on December 16, 2010.