DIY Green Wedding Favors With A Twist

There is something brilliantly refined and luxurious about paper which has been sewn on a sewing machine.
The string through the paper adds texture and a surprising little detail many people just can't resist touching when they see it.One sheet of 8.5x11" (A4) paper makes two small bags.
The bags are perfect for small "light weight" treats like Salt Water Taffies or similar candies.
You can make all your bags well in advance of your wedding and simply store them "open" until the week of the wedding.
Here is how I make these striking DIY wedding favor bags:
You can also decorate your plain paper with text on your computer before you begin making your bags or simply decorate with stickers, stamps or similar embellishments. When I made these little bags I created a design on my computer for half a 8.5x11" (A5) piece of paper. You can download my designs here.
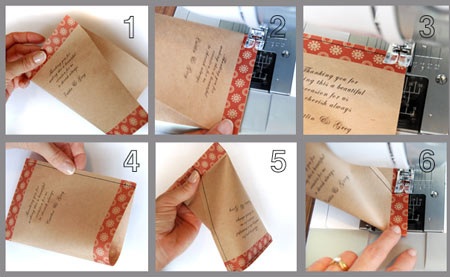
- Firstly cut a piece of 8.5x11" (A4) in half. You can use patterned paper, plain white paper or colored paper if you wish. The possibilities are truly endless! Make sure you use paper which is less heavy than cardstock but a little bit heavier than normal printing paper; a paper density of about 120gsm is pretty good for this project. For this tutorial, I used a roll of recycled, brown packing paper which I cut to size.
- Now place the top edge of your paper under your sewing machine's "presser foot." Keep the two top corners pinched together and arrange your paper so the corners are pointing towards you. As you lower down the "presser foot" onto your paper you will most likely create a small crease in the paper at the top. Don't worry about this little crease, it won't detract from the beautiful end result.
- With small stitches sew together the top part of the paper. Begin this by lightly securing the seam as you would if you were sewing in fabric. Stop sewing approximately 0.2 inches from the tip of the corners you pinched together earlier. With the needle down lift the "presser foot" and carefully turn your paper 90 degrees against the clock "around" the needle. You are now ready to sew down the long side of the paper. Again, lower the "presser foot" and sew all the way down to the edge of your paper. Remember to secure the seam before you remove the paper from the sewing machine.
- Trim off any excess strings hanging from the paper for a neat look. You should now have a bag which is only open on one end, ready to fill with your chosen wedding favor. When you have sewn all your bags (on two sides only) you can simply store them in a bag until you need them.
- Fill your bag with your wedding favor treats and prepare to close the bag. Be careful not to overfill your favor bags. Press the side with the seam and the side without the seam (the curve) together centering the seam. The bottom of your bag should now be closed in the opposite direction of the top of the bag. This is what gives the bag the unusual almost "triangular" shape.
- When you are ready to stitch up and close your bag, simply place the bottom edge of the paper under the "presser foot" like you did at the top. Sew the bottom of the bag approximately 0.2 inches from the edge. Remember to secure your seam at the beginning and at the end before you remove the bag from the sewing machine. Now cut off any excess string and your bag is finished!
Although this project sounds involved, it takes me less than 1 minute to complete one bag. It's so easy and when you get the hang of it you will be amazed how quick this little project is.