Behind The Lens: Bracketing, HDR And How To Tell Delicious Culinary Stories Through Photography
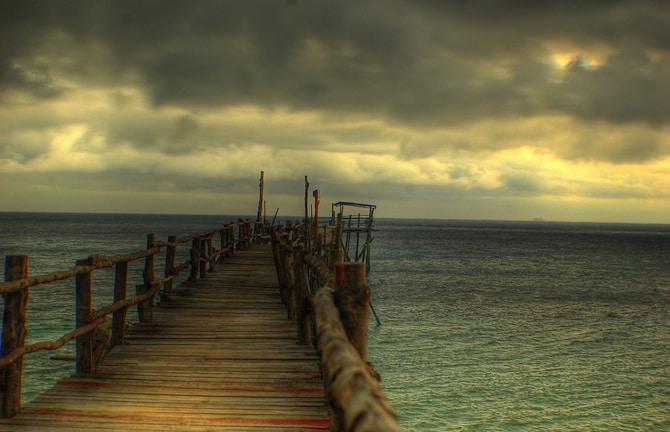
HDR Photography. Photo courtesy of Haffizan Ismail Photography.
"When you have a tricky lighting situation, it can be hard to get the details in the highlights and the shadows. Two alternatives you may use are neutral density filters and bracketing."
Today in my Photography II class — taken in New York City at PhotoUno Photography School — Patricia is teaching us about ways we can approach high contrast situations when we want to capture both the light and dark of it. First, she demonstrates neutral density filters which allow you to modify the light intensity of the entire scene equally, even when there are different colors.
Says Patricia, "It is basically as if your lens was wearing sunglasses. With it on, you can either photograph long exposures during the day — cutting light — or use really big apertures in bright sunny days."
The downside? They're not one size fits all, so you'll need to purchase different ones for each lens, which can get expensive.
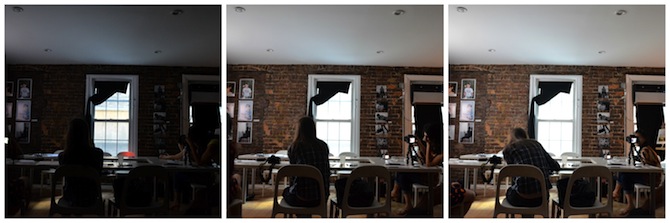
An example of bracketing taken during class. Obviously not the most exciting photo, but you get the idea.
Bracketing In Photography
What I find much more interesting than the filters is bracketing, a technique that allows us to get captivating high dynamic range (HDR) photos. Essentially, bracketing takes three photos: one neutral, one two stops overexposed, and one two stops underexposed to give you three images. From there, you'll use a program to blend them together and process them in a program.
What's critical to understand — and what can also be confusing, which was apparent by the 100 questions the class assaulted at Patricia — is the neutral photo does not necessarily have to be the one you get by changing all your settings to neutral on the exposure indicator. It's the one that shows "juicy midtones" in the histogram. You can certainly start at neutral exposure, check your histogram and then go from there. Once you have your histogram with rich midtones — whether your exposure indicator is at zero or not — this will be the "neutral exposure" you'll use for bracketing.
Now, check if your camera has a bracketing button built in. If it does, set your camera on a tripod, use continuous shooting with a 10 second delay — remember, you're taking three different photos and it needs time to think, which is why you should also have your focus set to manual so it's not constantly searching to re-focus — and set it to two stops over and two stops under. Press the button while the camera is set on your rich midtone neutral exposure and the device will go to work.
If your camera doesn't have this function you can still do manual bracketing (and either way it's wise to understand the process). You'll find the rich midtone shot just as before; however, instead of having your camera auto-bracket two stops up and two stops down you'll manually do this.
As we discussed previously when covering fine tuning — you can re-read on this by clicking here — a stop is equivalent to 3/3. So, to reach two stops more or less from neutral you'll do six "clicks."
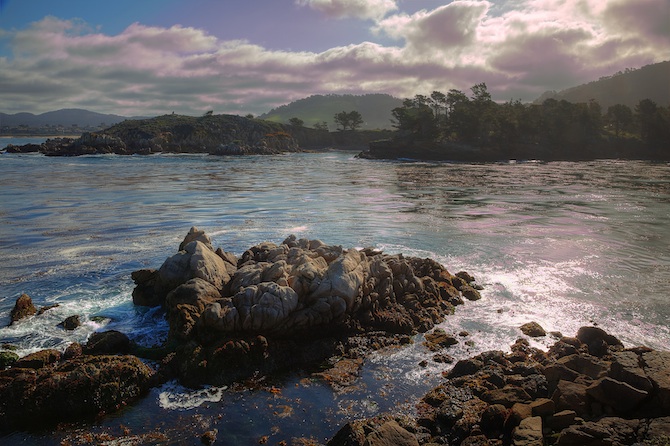
HDR Photography that doesn't look too fake, a common criticism of HDR. Photo courtesy of Angi English.
Keep in mind, bracketing with ISO will change the grain intensity of the photo, while bracketing with aperture will alter the depth of field, so you'll want to bracket with the shutter speed in order to keep the photo constant. Shutter speed affects motion, which won't matter in this instance as you'll be shooting something still.
Once you have your three photos we get to the program — in class Patricia demonstrated using Photomatix — to create your HDR photo. When merging the photos, some tips Patricia provides include always clicking "reduce noise" and "on underexposed photo only," as underexposed photos tend to produce noise. Moreover, HDR images are soft by nature, so you may want to add some sharpening.
When the photos are done processing you'll be left with an imperfect HDR photo. While to some people it may look fine (I'll admit I fell into that camp during class) you're not done yet. To enhance your photo even further, Tone Mapping is necessary. Here, tonal ranges are reduced in order to make the photo compatible for printing and online reading. This is also where the editing gets fun. There is a seemingly endless number of filters to choose from, and one can also download others if they want more. Manual adjustments to these pre-sets are also possible if you would like to tweak the color saturation, midtones, strength, shadows and blending point, to name a few options.
So why can't you just use the HDR button in your camera? You can, but the end result will not be the same.
"The HDR option that your camera gives you is a JPEG that has been compressed by the cameras computer," explains Patricia. "You don't have the freedom to play with your image and get the effect you want when you have the three bracketed images that you can process in the program."

Detailed shot of a dandelion. Photo courtesy of Janos Csonger Kerekes.
Storytelling
Knowing how to shoot HDR is not only helpful for creating interesting images, but also in storytelling. We end the class with a lesson on how to do this effectively by knowing how to expertly sequence images. According to Patricia, the photographer first needs to choose the subject and place before logically and emotionally sorting the images.
You'll begin with your Cover Shot, which should be your strongest photo but also convey a sense of the place. To me it reminded me of trying to come up with a title for an article post, where I want to really grab the reader's attention.
"If I'm trying to tell the story of a day in Central Park and my Cover Shot is a girl dressed as a mermaid people will be confused," Patricia explains. "That would be better for the Mermaid Parade in Coney Island."
After your Cover Shot comes your Establishing Shots that give the viewer a sense of the scene, where you are, what time of day it is and what the weather is like. For these shots Patricia recommends trying HDR, as it's often nice for landscapes and adds an evocative feel to the photo series.
Next you'll have your Detail Shots, close ups and have shallow depth of field photos. These show the reader small details not entirely apparent when viewing the entire scene at once. Additionally, it shows the scene is a different way, getting them up close and personal with the photographer's experience.
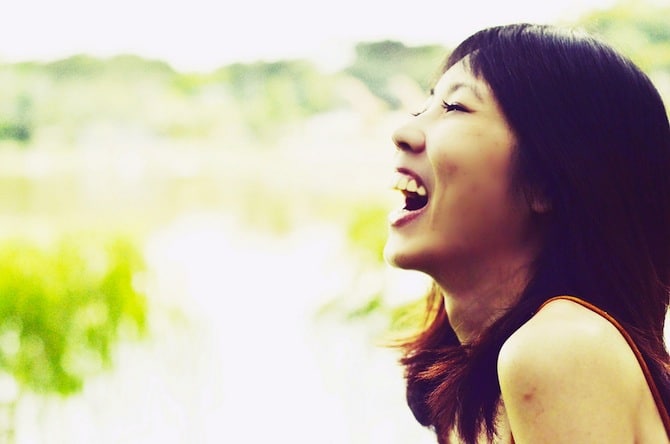
Candid moment. Photo courtesy of y i v a.
Afterward, you'll add in some Filler Shots, which add emotion to the piece. These will be candid moments, expressions and bursts of emotion that add some contrast in feel to the photo essay and humanizes it, really helping the viewer to connect.
Your Closing Shot should be just like when you write the conclusion of a text story. You can choose whether to provide a definitive ending — say, showing the airport at the end of a trip — or a cliff hanger — maybe someone walking toward their next destination.
The Story Of Kale
For an idea of how this might go Patricia provides the example of shopping for kale at the farmers market. You could have your significant other as the subject, shooting them holding produce, tasting some kale, chatting with purveyors, looking amazed after taking a bite of kale, some close ups of the kale from different angles, a shot of the farmers market sign, and some photos of you both cooking the kale, with the ending being the empty plate with some specks of kale left.
Get Creative
Remember with all of these steps you don't just want to shoot straightforward. Get creative with your angles and framing (like having a frame within the frame of your camera), shoot from different points of view and get as many shots as you can. In the very beginning of the course Patricia had recommended an exercise where we take a subject and photograph it 40 different ways. It may be hard, but in the end you'll undoubtedly end up with some interesting images for your story.

Interesting perspective of blackberries. Photo courtesy of threelayercake.
Recapping on what we've learned in the previous weeks of PhotoUno's Photography II class — you can read more about these lessons in Epicure & Culture's Behind the Lens Series — Patricia reminds us of the important elements in photography. Light, color, composition and expressions of our subjects all affect the way a photo comes out. Whether we shoot in day vs night, use shallow or deep depth of field, use complementary or analogous colors and how we frame our photos will all lead the viewer to react differently to a photo. Keep this in mind when shooting.
Food Photography
As someone who enjoys writing about food, I love Patricia's kale example, and begin to think about how I can take my text and one-off food photos and transform my experiences into culinary adventures through images. Instead of just seeing a plate of food and showing people something I've eaten or a cocktail I've sipped, it takes the focus off me and tells the story of the dish — most likely the subject most people want to learn about, anyway. The origins of the meal, what went into it, a moment with the chef, specific spice enhancers, how it was presented and what the experience of eating was actually like. Sure, I could say this through words, but isn't a picture worth 1,000 of those?
Have you practiced or perfected the art of photo sequencing? Please share your tips in the comments below.
Also Check Out:
Behind The Lens: To Flash Or Not To Flash (Photography)
Behind The Lens: How To Use Lighting And Composition For Storytelling In Photography
The post Behind The Lens: Bracketing, HDR And How To Tell Delicious Culinary Stories Through Photography appeared first on Epicure & Culture.